How To Use VascuChek: A Complete Training Guide

Transfers volume from internal to external Bluetooth® speaker
Volume Increase Switch
Volume Decrease Switch
Power/Low Battery Indicator
Power Switch
What Is VascuChek?
The VascuChek® is a rechargeable, wireless device that uses modern Doppler technology to create sound representing blood flow within a vessel. VascuChek outperforms current Doppler systems that use a large transceiver box equipped with tethered probes and restrictive cords. VascuChek is a simple, intuitive device that allows you to instantly check your patients’ blood flow in a non-sterile environment and sterile field, hassle-free and without interruption.
A push-button that, when depressed, increases the volume of the audible Doppler signal. A double tone sounds at each volume increase with the second tone at a higher pitch. When maximum volume is reached, a double tone at the same pitch will sound.
A push-button that, when depressed, decreases the volume of the audible Doppler signal. A double tone sounds at each volume decrease with the second tone at a lower pitch. When minimum volume is reached, a double tone at the same pitch will sound.
A yellow LED which, when illuminated, indicates that the batteries are nearly depleted. The system will automatically shut OFF when the battery voltage is too low to maintain proper operation of the unit.
A push-button, that when depressed, turns the unit ON and plays an audible confirmation tone. Illumination of a green LED indicates Power ON and battery voltage is above the low battery threshold. A yellow LED shows the internal battery is nearly depleted, and flashing red indicates the device is shutting down due to low battery or if no probe is detected. An additional single press Powers OFF the unit and plays a distinct audible confirmation tone.
Setup
CAUTION: Prior to use, inspect the Doppler probe for damage, such as sharp edges or cracks that could allow for the ingress of fluids.
Carefully unpack your VascuChek Transceiver. Inspect the transceiver for damage. If the transceiver is missing or any damage is found, contact Remington for further instructions.
Transceiver & Charger Placement
The VascuChek Transceiver requires special EMC precautions and needs to be installed and put into service according to the EMC information located in the Technical Description section of your Instructions for Use (IFU) documentation. Portable and mobile RF communications equipment can affect the VascuChek Transceiver.
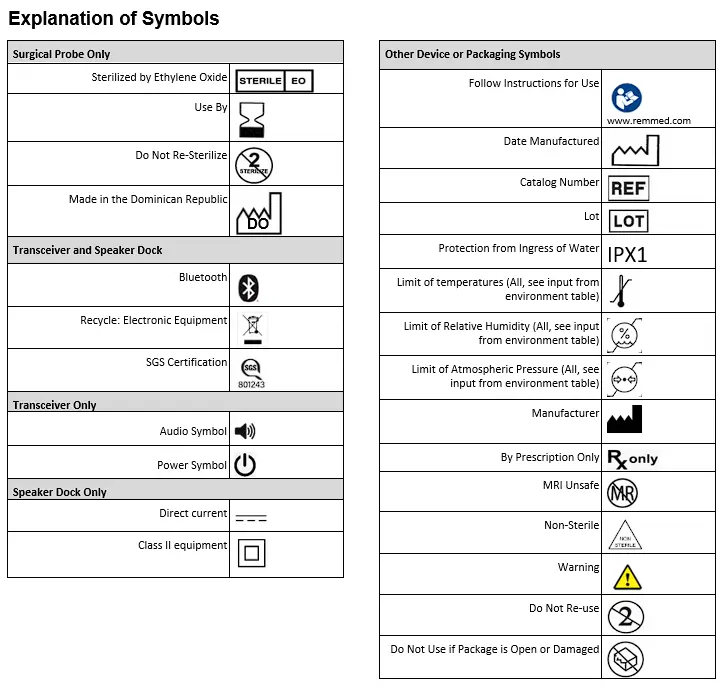
Place the VascuChek Charger on a suitable stand, cart, or table outside of the sterile field. The VascuChek Transceiver should not be used in the presence of any high-frequency equipment, including high-frequency surgical generators. The transceiver has a rating of IPX1. Keep the transceiver away from all open liquids.
Charging the Transceiver
CAUTION: Use only with VascuChek Charger.
Connect the power supply to a hospital-grade outlet that is easily accessible. The charger LED becomes illuminated white. Place the transceiver into the charger with the buttons facing outward. When the transceiver is properly connected, the charger LED switches from white (power connected) to charge status:
Green Flash – Charging
Green – Charge Complete
Slow Yellow Flash – Fault (See your Troubleshooting Guide)

Doppler Probe Connection
Doppler Probe Selection
CAUTION: Prior to use, inspect the surgical Doppler probe and clinical Doppler probe for damage, such as sharp edges or cracks that could allow for the ingress of fluids.
For surgical application, use a surgical Doppler probe. For non-surgical application, use a clinical Doppler probe.
The VascuChek Transceiver is designed to function only with Doppler probes that are compatible. Keep connectors away from all liquids. Acoustical output tables and information required by IEC 60601-2-37 can be found in the Technical Description of your IFU.
Clinical Doppler Probe
Insert the transceiver into the open end of the Doppler probe and press until it clicks into place.

Surgical Doppler Probe With Sheath
- Using aseptic technique, open the outer packaging and dispense the Doppler probe into the sterile field.
- Remove the Doppler probe from remaining packaging and hold it by its tip, with the open end ready to receive the transceiver. Note: Avoid gripping the Doppler probe’s sheath as this will be deployed in future steps.
- Transfer the transceiver into the sterile field by inserting it into the open end of the Doppler probe and pressing until it clicks into place.
- Hold the tab marked “Pull” and pull steadily to extend the sheath completely over the transceiver.
- Continue pulling to remove the tab and expose internal adhesive.
CAUTION: The sterile field may be compromised if the sheath does not completely cover the transceiver or if anything else is allowed to touch the transceiver.
- Press the sides marked “Seal” together to seal the transceiver within the sheath. Ensure a complete seal is established at the open end of the sheath.
Preparation for Use
Prior to use, charge the VascuChek Transceiver as per the Charging the Transceiver section above. Turn the transceiver on by depressing the Power Switch. The initial volume level will be maintained from the previous use.
Adjust the volume by depressing the Volume Increase or Decrease push-button multiple times until the desired volume is achieved. A double tone confirms each volume increase and decrease, and a double tone of the same pitch confirms maximum and minimum volume. Some “white noise” (a sound like a radio that is tuned between stations) may be heard from the transceiver speaker.
To verify that the system is operational, gently apply sterile ultrasound gel to the Doppler probe using aseptic technique and move along any convenient sterile surface. This movement produces a loud rasping noise, confirming that the system is operational.


Modernize Your Vascular Screenings Today
Starting your journey to better flow checks is as simple as finding some time on your calendar for a demonstration. Contact us today to schedule a VascuChek virtual demo.

